
1. Introduction
1.1. What is AsciiDoc
AsciiDoc is a lightweight markup language1 used for writing structured documentation, with an adoc file extension. It has easy-to-read syntax, rich features, and flexible customization options, making it ideal for creating technical documentation, books, and web content. With Asciidoctor, a Ruby tool, it can be converted into multiple formats such as HTML, PDF, and EPUB.
Note |
|
1.2. AsciiDoc vs. Markdown
Markdown is one of the most popular markup languages, commonly used in blog posts and is a conventional format for README files in software projects. It is easy to learn, enabling simple and quick content formatting, and has built-in support across various platforms including GitHub, GitLab, and static site generators.
Due to its minimalistic design, it has become a favorite among general users, developers, and bloggers. However, compared to Markdown, AsciiDoc may be a better fit if you want to:
Equip your document with more features.
AsciiDoc natively supports advanced elements such as merging cells in tables and automatic cross-references between documents, without using extensions or plugins as Markdown does.Customize the content and format more heavily.
AsciiDoc allows you to fine-tune the presentation by defining custom roles to apply specific CSS classes, or using attributes to dynamically insert reusable values across your document, which Markdown does not support.Generate output in multiple formats.
Using Asciidoctor, you can easily convert an AsciiDoc file to various formats including HTML, PDF, EPUB, DocBook, and slide decks, whereas Markdown requires additional tools or plugins.
2. Setting Up Your Environment
Before you start writing AsciiDoc content, it’s important to set up an editor that supports AsciiDoc syntax and features.
Install a text editor or integrated development environment (IDE) of your choice.
Install the appropriate AsciiDoc plugin or extension to enable syntax highlighting, live preview, and other useful features.
See below for popular editors and their available AsciiDoc support:
| Text Editor | AsciiDoc Support |
|---|---|
Visual Studio Code (recommended) | Install the |
Atom | Install the |
IntelliJ IDEA | Install the AsciiDoc Plugin from the JetBrains marketplace. |
3. Writing AsciiDoc Documents
With your editor set up, you can begin your AsciiDoc project. To generate polished outputs like PDF or HTML, you’ll need supporting files such as YAML configuration and custom font settings, and it’s important to organize your project properly.
3.1. Document Structure
Here is an example directory structure:
my-project/
├── content/
│   ├── index.adoc
│   └── chapters/
│       ├── introduction.adoc
│       └── setup.adoc
├── themes/
│   └── custom-theme.yml
├── fonts/
│   ├── roboto-regular.ttf
│   ├── roboto-bold.ttf
│   └── roboto-italic.ttf
└── images/
AsciiDoc Files (
.adoc)
AsciiDoc files form the main body of your project. You can split a large project into multiple .adoc files and include them using theinclude::directive to keep things modular and manageable. For example, inmy-project/content/index.adoc:= My Project Title Author Name :doctype: book :toc: :sectnums: include::chapters/introduction.adoc[] include::chapters/setup.adoc[]
YAML Configuration Files (
.yml)
YAML files are often used alongside AsciiDoc when you use conversion tools like Asciidoctor PDF. The YAML theme file allows you to define project-level settings, such as page size, and font settings. You can use a theme that extends from the default AsciiDoc theme:extend: default page: size: A4 layout: portrait font: catalog: NotoSans: normal: fonts/NotoSans-Regular.ttf bold: fonts/NotoSans-Bold.ttf italic: fonts/NotoSans-Italic.ttf bold_italic: fonts/NotoSans-BoldItalic.ttf base: font_family: NotoSans font_size: 10 base: background_color: #ffffff text_color: #333333 table: border: 1px solid #ddd padding: 0.5em background: #fafafaCustomized Fonts
By default, AsciiDoc uses system fonts, but you can specify your own font families for different parts of the document such as body text and code blocks. If your document includes non-English characters, you need to reference a custom font to support these characters. See Google Fonts for a wide selection of fonts.
3.2. Basic Syntax
Create and name your file with the .adoc extension. See the following sections for the basics of AsciiDoc syntax and common elements.
3.2.1. Document Header
The document header is optional, which encapsulates the document title, author, revision information, document-wide attributes, and other document metadata.
| An Example Header | Result |
|---|---|
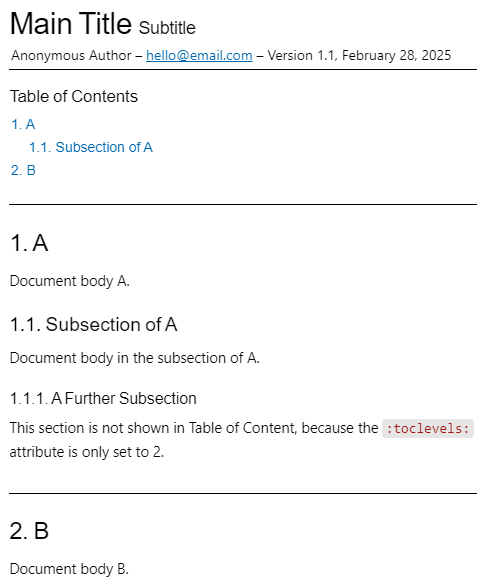
= Main Title: Subtitle Anonymous Author <hello@email.com> 1.1, February 28, 2025 :description: The document's description. :doctype: article :toc: :toclevels: 2 :sectnums: :sectanchors: == A Document body A. === Subsection of A Document body in the subsection of A. ==== A Further Subsection This section is not shown in Table of Content, because the `:toclevels:` attribute is only set to 2. == B Document body B. |
|
3.2.2. Sections and Breaks
| Aspects | Syntax | Result |
|---|---|---|
Section levels | == Level 1 Section Title === Level 2 Section Title | 1. Level 1 Section Title1.1. Level 2 Section Title |
Page breaks |
| |
Thematic breaks | 3 repeating characters of Subject A --- Subject B | Subject A Subject B |
Line breaks | This is the first line. + This is the second line. You can also add | This is the first line. |
You can also customize section ID generation, numbers and styles. Refer to the official AsciiDoc documentation here for more details.
3.2.3. Text Format
| Aspects | Syntax | Result |
|---|---|---|
Direct formatting: | *Bold text* _Italic text_ `Monospace` Subscript example: H~2~O Superscript example: x^2^ | Bold text |
Built-in roles, such as lead, big, small, underline, line-through, and subtitle. | [.big]#Big text# [.underline]#Underline text# [.line-through]#Line-through text# | Big text |
Custom roles | Label the text in adoc: [.my-custom-role] A paragraph with customized style. This is [.my-custom-role]#custom text#. Define the role in YAML: role:
my-custom-role:
font-color: #0000FF | A paragraph with customized style. This is custom text. |
3.2.4. Lists
| Aspects | Syntax | Result |
|---|---|---|
Ordered lists | . First item . Second item |
|
Unordered lists | * Item * Another item ** Nested item |
|
Checklists | * [*] Checked * [x] Also checked * [ ] Not checked |
|
Description lists | Cloud Providers::
PaaS:::
. OpenShift
. CloudBees
IaaS:::
. Amazon EC2
. Rackspace |
|
3.2.5. Links
| Aspects | Syntax | Result |
|---|---|---|
URL and Link macros | Ask questions in the https://chat.asciidoc.org[*AsciiDoc community chat*, window=_blank]. | Ask questions in the AsciiDoc community chat. |
Cross references |
See <<set-link-id, Custom Text to Display>> for more details. Using a section's title such as <<Links>> without assigning ID. | See Custom Text to Display for more details. Using a section’s title such as Links without assigning ID. |
Inter-document xref | Why a tiger icon? See my xref:[path-to-file]#section-id[Text to Display]! | Why a tiger icon? See my first post! |
3.2.6. Tables
| An Example Table | Result |
|---|---|
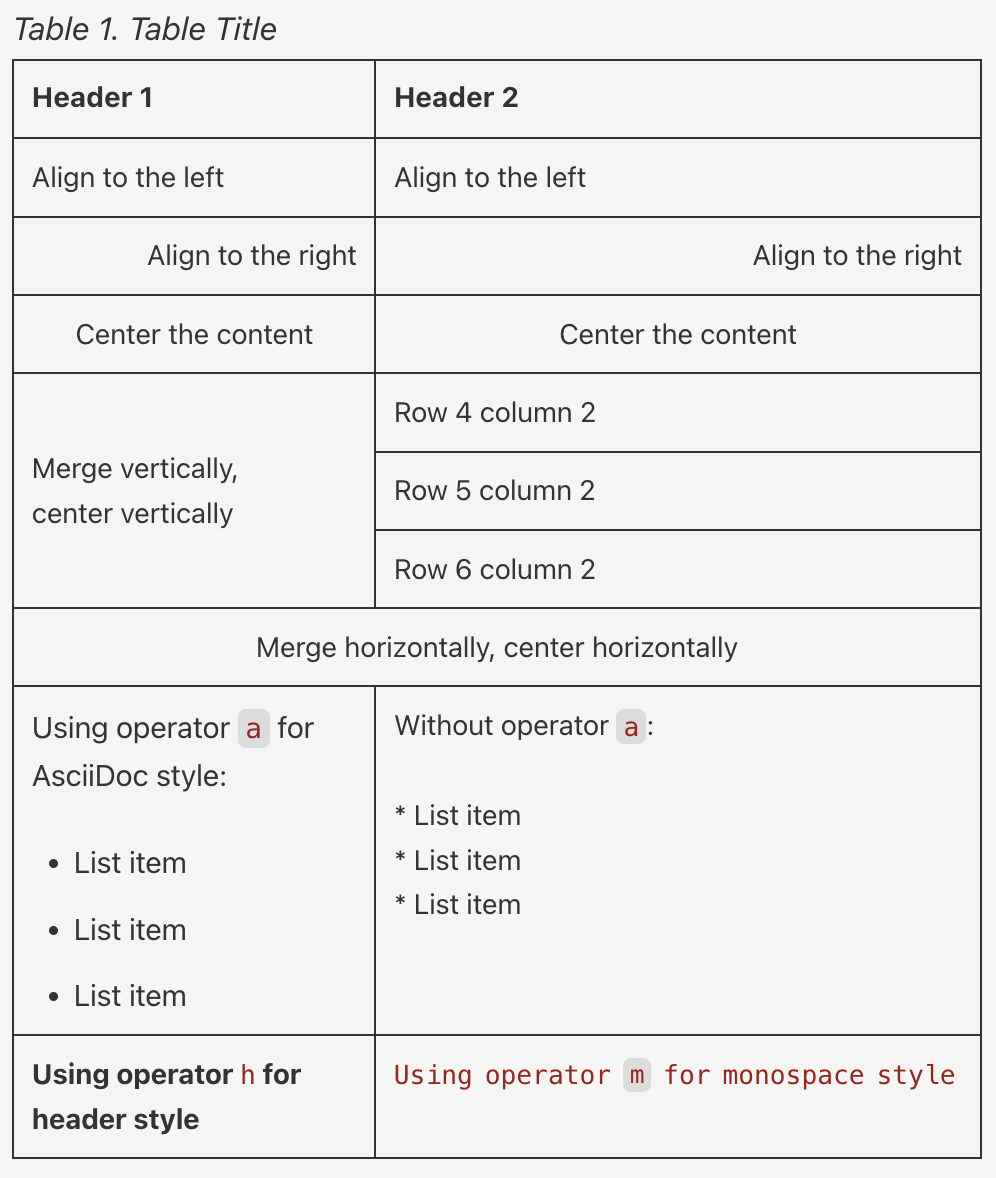
.Table Title [cols="3,5", options="header"] [frame="all"] |=== |Header 1 |Header 2 <|Align to the left <|Align to the left >|Align to the right >|Align to the right ^|Center the content ^|Center the content .3+.^|Merge vertically, center vertically |Row 4 column 2 |Row 5 column 2 |Row 6 column 2 2+^|Merge horizontally, center horizontally a|Using operator `a` for AsciiDoc style: * List item * List item * List item |Without operator `a`: * List item * List item * List item h|Using operator `h` for header style m|Using operator `m` for monospace style |=== |
|
You can also customize table width, format (such as using a CSV format), table caption, and more. Refer to the official AsciiDoc documentation here for more details.
3.2.7. Images
| Syntax | Result |
|---|---|
Basic syntax: .Image Caption Displayed image::<path-to-file>[optional description, width, height, other definitions] Example: .Tiger Icon image::/tiger.png[tiger, 50, 50, align="center"] |  Figure 1. Tiger Icon |
3.2.8. Other Useful Elements
| Aspects | Syntax | Result | ||||
|---|---|---|---|---|---|---|
Admonitions, including:
| WARNING: This is a warning! [NOTE] ==== This is a note section: . List item 1 . List item 2 ==== |
| ||||
Footnote ( | This is my footnote footnote:[Example footnote at the end of the page]. | |||||
Source code blocks | [source, python]
----
first = first-name
last = last-name
print(f"Hello, {first} {last}!")
---- | | ||||
| include::<path-to-file>[Optional parameters here] | |||||
| ifdef::env-github[] So much content here is for GitHub only. endif::[] ifndef::env-github[] So much content here is not shown on GitHub. endif::[] | |||||
| ifeval::[{sectnumlevels} == 3]
If the `sectnumlevels` attribute is 3, this sentence is included.
endif::[] |
4. Converting AsciiDoc
AsciiDoc can be converted into various formats depending on your needs. This section primarily focuses on converting AsciiDoc to PDF, which is a common requirement for documentation and publishing.
4.1. Installing Asciidoctor PDF
Asciidoctor PDF is a Ruby-based tool that converts an AsciiDoc document directly to a PDF document. Here are the steps to install Asciidoctor PDF on different operating systems1:
On Windows
If you’re using Windows with WSL2 (Windows Subsystem for Linux 2)2:
Check if you have Ruby available in your WSL2 terminal (e.g., Ubuntu):
ruby -v
If not, install Ruby:
sudo apt update
sudo apt install ruby-full
Install Asciidoctor and Asciidoctor PDF:
gem install asciidoctor
gem install asciidoctor-pdf
Verify the installation of Asciidoctor PDF:
asciidoctor-pdf -v
Note |
|
On MacOS
Check if you have Ruby available:
ruby -v
If not, install Ruby with Homebrew:
brew install ruby
Add Ruby to your
PATHby appending the following line to your shell configuration file (e.g.,.zshrcon macOS):echo 'export PATH="/opt/homebrew/opt/ruby/bin:$PATH"' >> ~/.zshrc
Install Asciidoctor and Asciidoctor PDF:
gem install asciidoctor
gem install asciidoctor-pdf
Verify the installation of Asciidoctor PDF:
asciidoctor-pdf -v
4.2. Generating PDF from AsciiDoc
Once you have Asciidoctor PDF installed and your AsciiDoc files ready, you can convert them to PDF using the command line. Simply run asciidoctor-pdf render-me.adoc in the terminal.
To customize the output, you can use a custom theme to control layout, fonts, color, table of content, and other elements. Here is a basic command with a customized theme:
asciidoctor-pdf --theme path/to/theme/basic-theme.yml -a pdf-fontsdir="path/to/fonts;GEM_FONTS_DIR" render-me.adoc -o output.pdf
Several attributes (-a) can be used in the command:
--themeTo apply a custom theme. Without specification, the default theme will be used.
-a pdf-fontsdirTo specify the path to the fonts directory. Include
GEM_FONTS_DIRif you also use bundled fonts (i.e., the default fonts included with Asciidoctor PDF).-oTo specify the output file name.
4.3. Sample PDF Output
To give you a clear demonstration, this page was written in AsciiDoc. See this generated PDF output created using the following theme:
font:
  catalog:
    Noto Serif:
      normal: GEM_FONTS_DIR/notoserif-regular-subset.ttf
      bold: GEM_FONTS_DIR/notoserif-bold-subset.ttf
      italic: GEM_FONTS_DIR/notoserif-italic-subset.ttf
      bold_italic: GEM_FONTS_DIR/notoserif-bold_italic-subset.ttf
    Roboto Mono:
      normal: ../fonts/RobotoMono-Regular.ttf
      bold: ../fonts/RobotoMono-Bold.ttf
      italic: ../fonts/RobotoMono-Italic.ttf
      bold_italic: ../fonts/RobotoMono-BoldItalic.ttf
page:
  background_color: FFFFFF
  layout: portrait
  margin: [0.65in, 0.5in, 0.65in, 0.5in]
  size: A4
  numbering:
    start-at: after toc
base:
  text_align: justify
  font_color: 333333
  font_family: Noto Serif
  font_size: 10
  line_height_length: 13.5
  font_size_large: round($base_font_size * 1.25)
  font_size_small: round($base_font_size * 0.7)
  font_size_min: $base_font_size * 0.75
  font_style: normal
  border_color: 333333ff
  border_radius: 4
  border_width: 0.7px
role:
  lead:
    font_size: $base_font_size_large
  line-through:
    text_decoration: line-through
  underline:
    text_decoration: underline
  big:
    font_size: 1.2em
  small:
    font_size: 0.8em
  subtitle:
    font_color: 999999
    font_size: 0.8em
    font_style: normal_italic
  my-custom-role:
    font-color: #0000FF

vertical_rhythm: $base_line_height_length
horizontal_rhythm: $base_line_height_length
link:
  font_color: 428BCA
codespan:
  font_color: #005A9C
  font_family: Roboto Mono
  font_size: 9
button:
  content: "[\u2009%s\u2009]"
  font_style: bold
heading:
  text_align: left
  font_color: $base_font_color
  font_style: bold
  h1_font_size: floor($base_font_size * 2.6)
  h2_font_size: floor($base_font_size * 2.15)
  h3_font_size: round($base_font_size * 1.7)
  h4_font_size: $base_font_size_large
  h5_font_size: $base_font_size
  h6_font_size: $base_font_size_small
  line_height: 1.7
  margin_top: $vertical_rhythm * 0.3
  margin_bottom: $vertical_rhythm * 0.5
  min_height_after: auto
  h1_line_height: 2.5
title_page:
  text_align: right
  title:
    top: 55%
    font_size: $heading_h1_font_size
    font_color: 333333
    line_height: 0.9
  authors:
    margin_top: $base_font_size * 1.25
    font_size: $base_font_size_large
    font_color: 181818
  revision:
    margin_top: $base_font_size * 1.25
block:
  margin_bottom: $vertical_rhythm * 1.2
caption:
  align: center
  font_size: $base_font_size * 0.95
  font_style: italic
  margin_inside: $vertical_rhythm / 3
  margin_outside: 0
admonition:
  font_size: 9
  font_color: 666666ff
  column_rule_color: $base_border_color
  column_rule_width: $base_border_width
  padding:
    [
      $vertical_rhythm / 3.0,
      $horizontal_rhythm,
      $vertical_rhythm / 3.0,
      $horizontal_rhythm,
    ]
  label:
    text_transform: uppercase
    font_style: bold
quote:
  font_size: $base_font_size_large
  border_color: $base_border_color
  border_width: 0
  border_left_width: $horizontal_rhythm / 3
  padding:
    [
      $vertical_rhythm / 4,
      $horizontal_rhythm,
      $vertical_rhythm / 4,
      $horizontal_rhythm + $quote_border_left_width / 2,
    ]
  cite:
    font_size: $base_font_size_small
    font_color: $role_subtitle_font_color
verse:
  font_size: $quote_font_size
  border_color: $quote_border_color
  border_width: $quote_border_width
  border_left_width: $quote_border_left_width
  padding: $quote_padding
  cite:
    font_size: $quote_cite_font_size
    font_color: $quote_cite_font_color
# code is used for literal, listing, and source blocks and literal table cells
code:
  font_color: 444444ff
  font_family: $codespan_font_family
  font_size: 9
  padding: 3
  line_height: 1.1
  # line_gap is an experimental property to control how a background color is applied to an inline block element
  line_gap: 1
  background_color: f9f9f9ff
  border_color: CCCCCC
  border_radius: 3
  border_width: 0.3
conum:
  font_family: $codespan_font_family
  font_color: $codespan_font_color
  font_size: $base_font_size
  line_height: 4 / 3
  glyphs: circled
image:
  align: center
prose:
  margin_bottom: $block_margin_bottom
sidebar:
  background_color: EEEEEE
  border_color: 666666ff
  border_radius: $base_border_radius
  border_width: $base_border_width
  padding:
    [
      $vertical_rhythm,
      $vertical_rhythm * 1.25,
      $vertical_rhythm,
      $vertical_rhythm * 1.25,
    ]
  title:
    text_align: center
    font_color: $heading_font_color
    font_size: $heading_h4_font_size
    font_style: $heading_font_style
thematic_break:
  border_color: $base_border_color
  border_style: solid
  border_width: $base_border_width
  padding: [$vertical_rhythm * 0.5, 0]
list:
  indent: $horizontal_rhythm * 1.5
  marker_font_color: 404040
  item_spacing: 1.3
  line_height_length: $base_line_height_length * 1.4
  font_size: $base_font_size * 0.95
  line_gap: 2
description_list:
  term_font_style: bold
  term_spacing: $vertical_rhythm / 4
  description_indent: $horizontal_rhythm * 1.25
callout_list:
  margin_top_after_code: -$block_margin_bottom / 2
table:
  align: center
  font_size: 9
  background_color: $page_background_color
  border_color: 000000ff
  border_width: $base_border_width
  grid_width: $base_border_width
  cell_padding: 4
  head:
    font-style: bold
    background-color: 'CCCCCC'
    font-size: 9
    border-bottom-width: 0.25
  caption:
    font-size: 9
    font-style: bold
  body:
    stripe_background_color: 999999ff
  foot:
    background_color: F0F0F0
toc:
  indent: $horizontal_rhythm
  line_height: 1.58
  dot_leader:
    content: ". "
    font_color: A9A9A9
    levels: all
  h2-font-style: bold
footnotes:
  font_size: round($base_font_size * 0.75)
  item_spacing: $list_item_spacing / 2
index:
  column_gap: $vertical_rhythm
header:
  font_size: $base_font_size_small
  line_height: 1.3
  vertical_align: bottom
  border_color: 333333
  border_width: 0.15
  height: 0.4in
  padding: [$base_line_height_length / 2, 0, 1, 0]
  font-family: Noto Serif
  recto:
    right:
      content: "Getting Started with AsciiDoc"
    left:
      content: "image::../images/portfolio/tiger.png[pdfwidth=3%]"
  verso:
    right:
      content: "{section-or-chapter-title}"
    left:
      content: "Getting Started with AsciiDoc"
footer:
  font_size: $base_font_size_small
  # NOTE if background_color is set, background and border will span width of page
  border_color: 333333
  border_width: 0.15
  height: 0.5in
  line_height: 1.2
  # padding: [$base_line_height_length / 1, 0, 2, 0]
  vertical_align: top
  recto:
    left:
      content: |
        Copyright © 2025 Xintong Wang
        For feedback or inquiries, please contact: mailto:xintong3248@gmail.com[]
    right:
      content: "{page-number}"
  verso:
    left:
      content: '{author} | Version {revnumber} ({revdate})'
    right:
      content: "{page-number}"